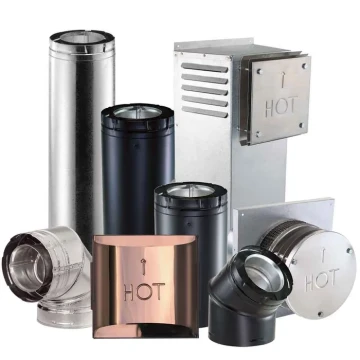
DirectVent® Pro
Stunning design and Engineered Excellence® utilizing state-of-the art manufacturing. DirectVent® Pro features tight inner connections for superb performance, with no gaskets or sealants required (unless specified by the appliance manufacturer). All black pipe lengths, pipe extensions, and elbows feature laser-welded outer wall seams for a sleek finish. Low-profile locks and no hems or beads allow for a beautiful product that looks elegant in any interior.
Engineered Excellence® with innovation and style…DirectVent® Pro. Duravent’s direct vent is specified exclusively by nearly every major stove and fireplace manufacturer in the U.S. and Canada, with the largest choice of termination caps for direct vent available.

- DirectVent® Pro Chimney Liner System Installation Instructions
- DirectVent® Pro Concentric Flex Installation Instructions
- DirectVent® Pro Horizontal Colinear Reline Kit Installation Instructions
- DirectVent® Pro Horizontal Termination Supplement Installation Instructions
- DirectVent® Pro Installation Instructions
- DirectVent® Pro Installation Instructions - Concentric
- DirectVent® Pro Installation Instructions (French)
- DirectVent® Pro Installation Instructions: Converting A Class-A Metal Chimney or A Masonry Chimney to A DirectVent® Systems
- DirectVent® Pro Vertical Wind Guard Installation Instructions
Typical Installation
Refer to our Typical Venting Installation drawings to select the appropriate component parts for your installation.
More Typical Installations:
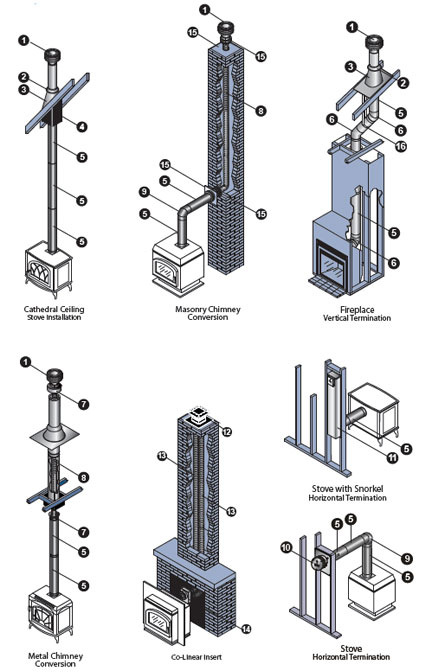
| Installation Key | |
|---|---|
| 1 | Vertical Termination Cap |
| 2 | Storm Collar |
| 3 | Flashing |
| 4 | Cathedral Ceiling Support Box |
| 5 | Pipe |
| 6 | 45° Elbow |
| 7 | Class A Chimney Conversion Kit |
| 8 | 4″ Flex |
| 9 | 90° Elbow |
| 10 | Horizontal Termination Cap |
| 11 | Snorkel Termination Cap |
| 12 | Colinear Kit |
| 13 | 3″ Flex |
| 14 | Co-Axial to Co-Linear Connector |
| 15 | Masonry Chimney Conversion Kit |
| 16 | Elbow Strap |
Planning Your Installation:
- For vertical gas stove installations, measure the height from the stove outlet to the ceiling to determine the length of black pipe required. Select a ceiling support/wall thimble cover or a cathedral ceiling support box.
- To determine the length of galvanized pipe required, measure the ceiling thickness and the vertical rise in an attic or second story. Firestops are required at each floor level beyond the first floor ceiling support/wall thimble cover or cathedral ceiling support box. If an offset is required to avoid obstructions, use a pair of 45° elbows. For proper support, use elbow straps with offsets. Use wall straps for long vertical runs. Attic Insulation Shield is required in attic.
- Measure the roof pitch. Select the proper flashing and storm collar. Determine the minimum height above the roof.
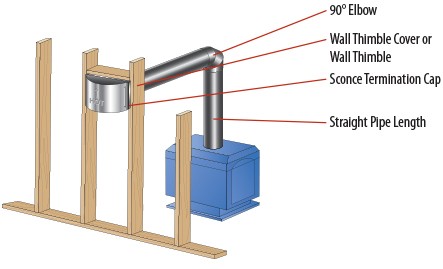
- For horizontal installations, check the appliance manufacturer’s instructions for minimum rise and maximum horizontal run. A snorkel termination may be used if height restrictions prevent adequate rise above the appliance. Select the appropriate Horizontal Termination Cap (see appliance manufacturer installation instructions). To protect vinyl siding, select vinyl siding standoff. Check appliance manufacturer’s instructions for wall thimble and firestop requirements.
Design Recommendations
- The following design recommendations are general guideline to assist in the design and selection of venting components for your installation. Always follow Duravent Installation instructions enclosed with the cap or support box before installing your chimney system. Installation instructions can be viewed online at www.duravent.com, under Catalogs and Instructions. Important: Check the manufacturer’s rating plate and instruction manual to confirm that the Duravent direct vent system is approved for use on the brand name appliance you have selected.
- The inner and outer pipe diameters should match the outlet size of the appliance.
- Check the appliance manufacturer’s installation instructions to confirm which types of vent configurations are permitted (i.e. horizontal, vertical, chimney reline, etc.). Also, check for any venting restrictions such as maximum horizontal run, minimum and maximum vertical rise, maximum offset, etc.
- Be fire safe! Maintain at least the minimum clearances (air-space) between the vent pipe and nearby combustibles, as specified in the appliance manufacturer’s installation instructions. Use proper support and bracing. Follow local building codes and have your venting system inspected.
